Photon User Guide
In this guide, we will go over some details about Photon not covered in our build guide
Remapping with ZMK Studio
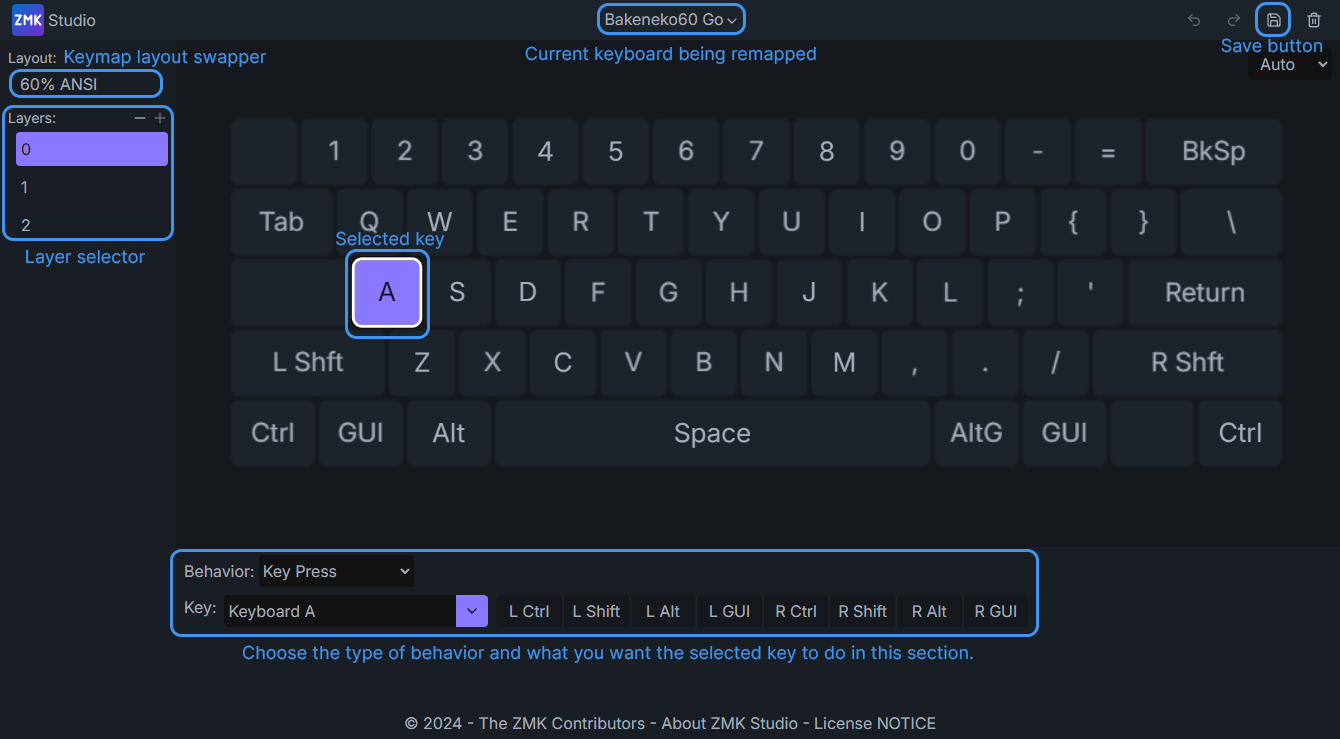
ZMK Studio can be found here, and can be used for on the fly key remapping! Simply connect your photon with the included USB cable, and input the following keys on the default keymap to unlock it: Hold FN+Right Alt and tap Enter.
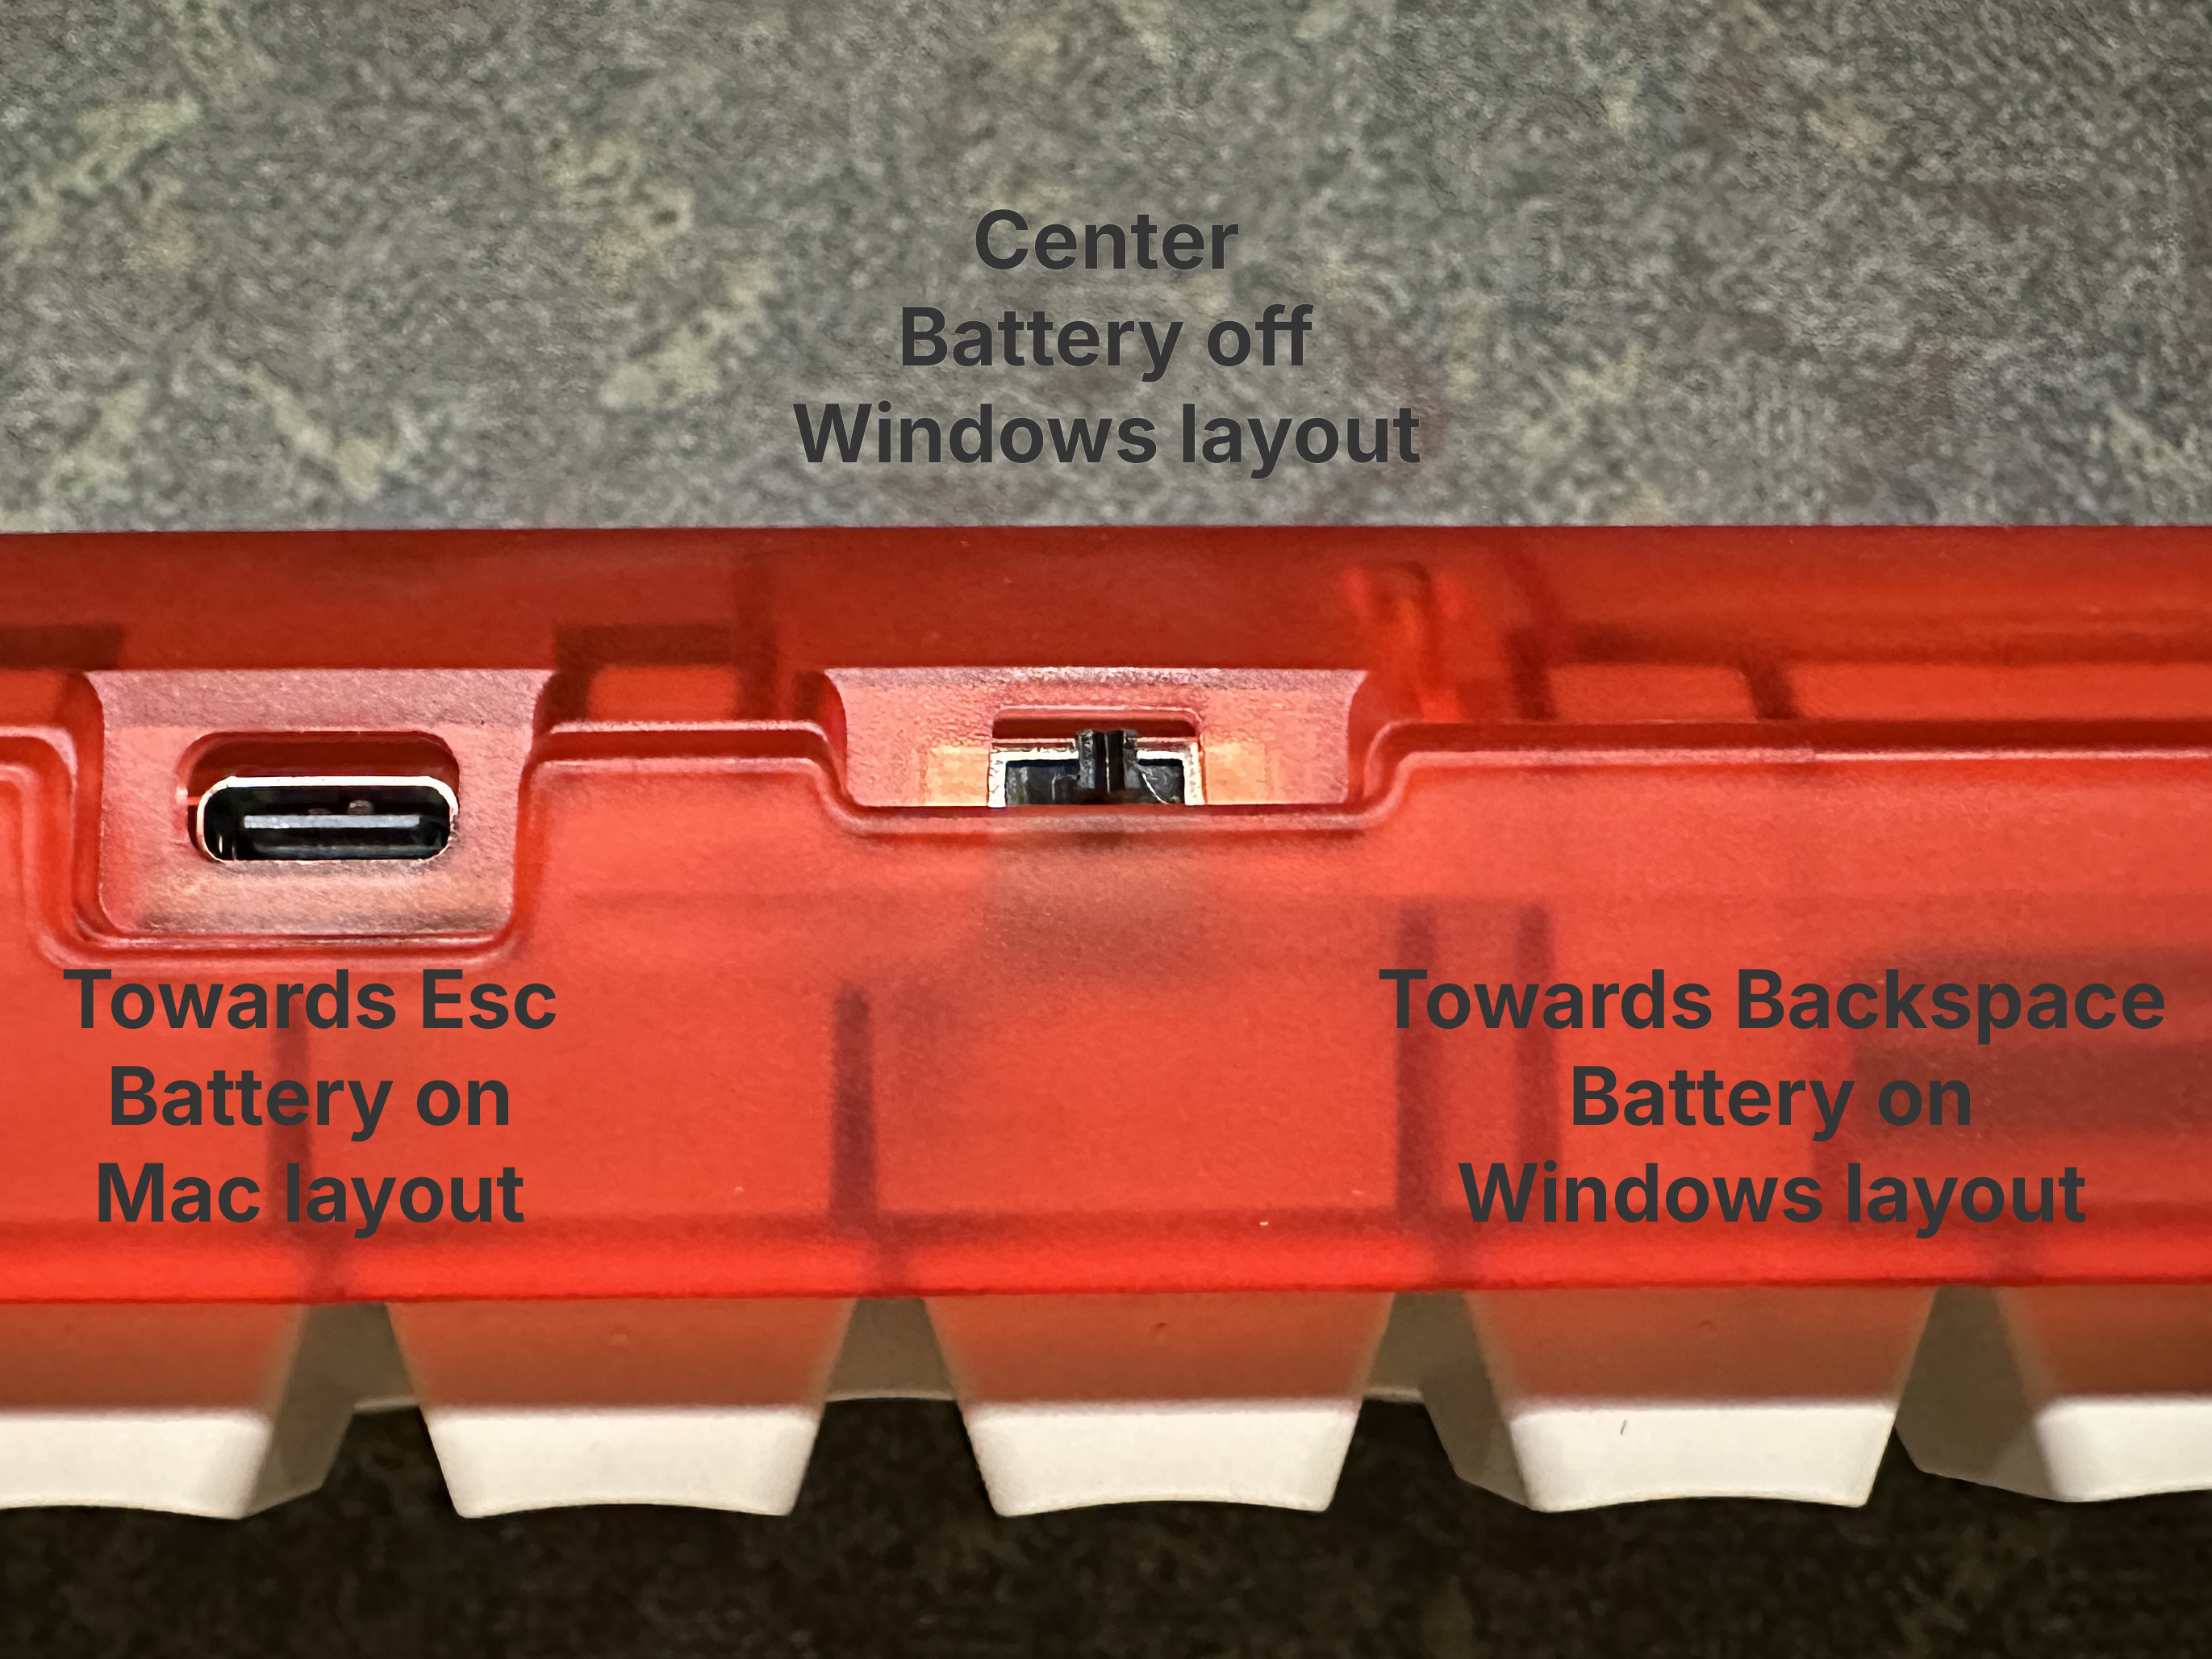
Back toggle switch
On the back of the keyboard there is a 3 way toggle switch that can be in the left, center, or right position. This controls which keymap is being used, and if the battery is off or on. By default, these are the positions:
- Left (towards esc key) - Battery on, Mac layout
- Center - Battery off, Windows layout
- Right (towards backspace) - Battery on, Windows layout
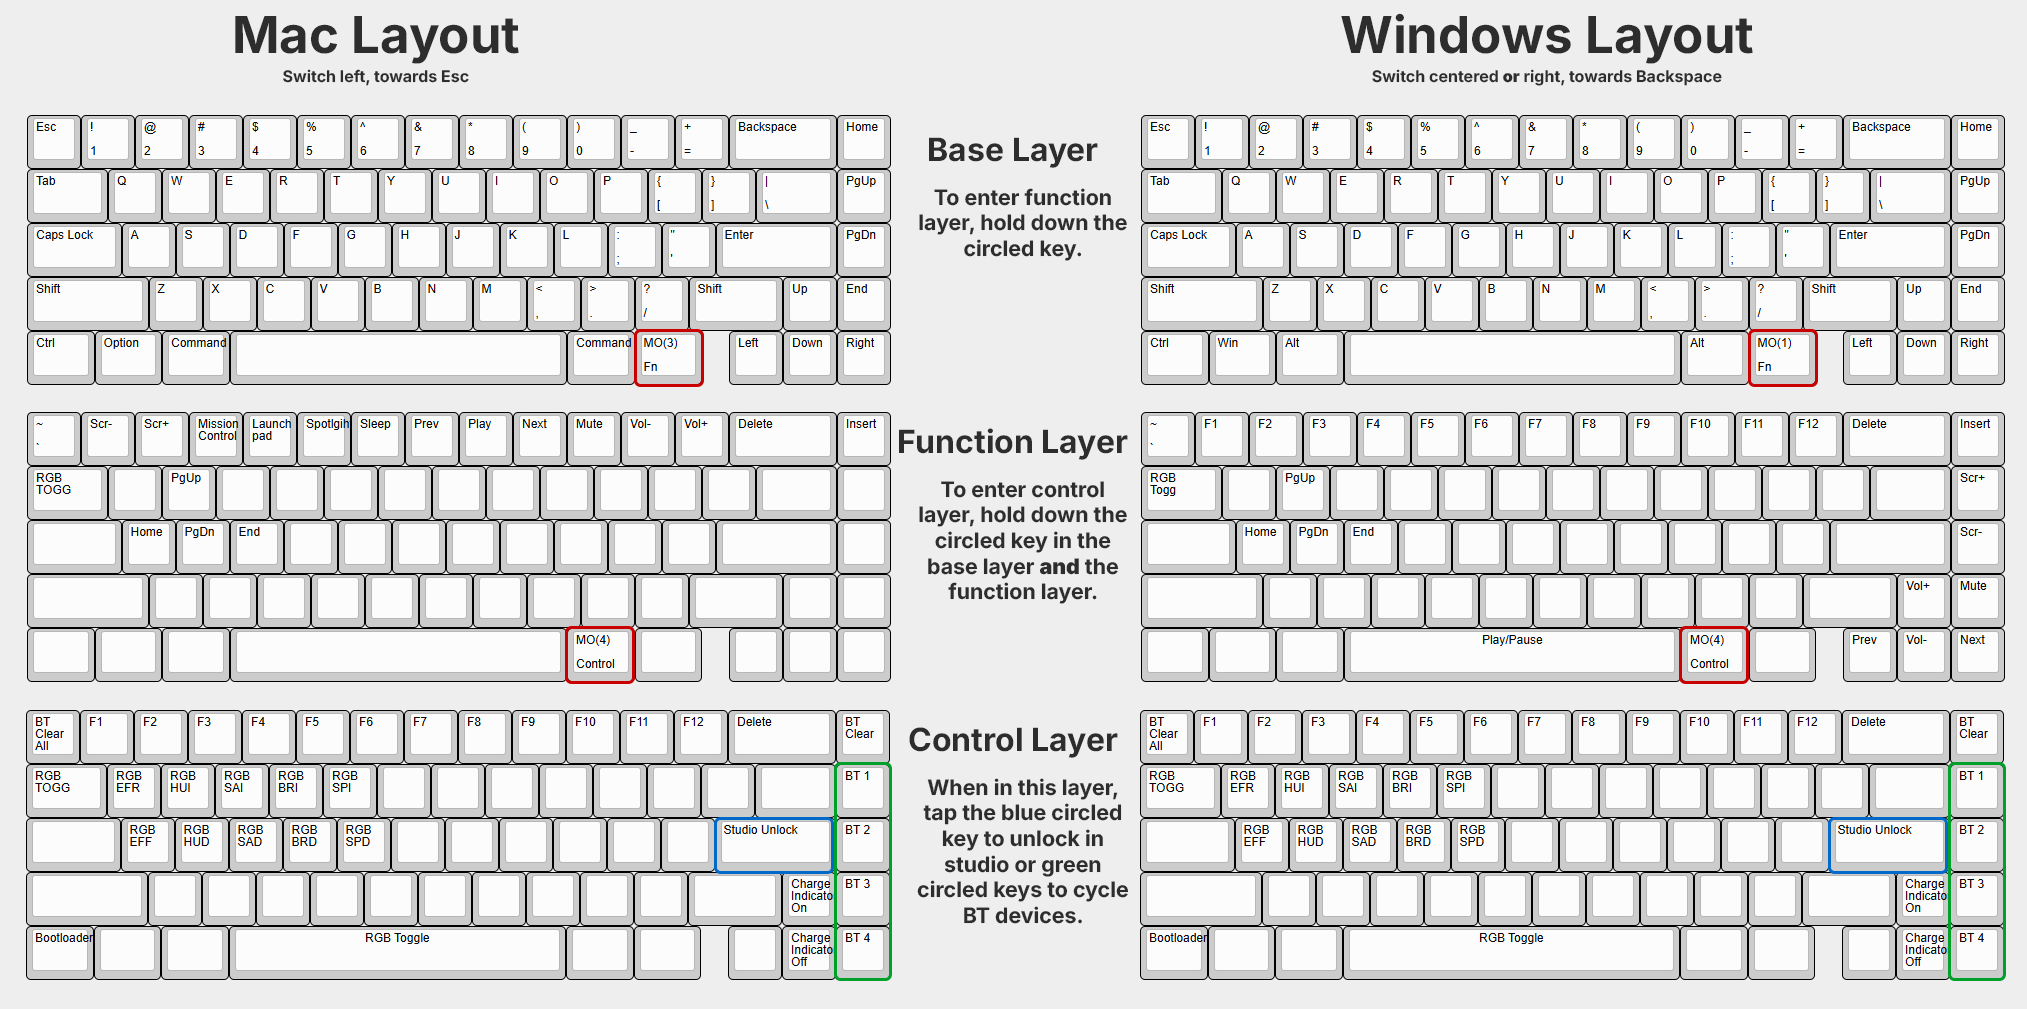
Default keymap
Below are the default keymaps found on the Photon. By default, there are Windows and Mac layouts programmed in, but you can remap them to anything you want, and they will be toggleable with the switch on the back!
Wireless BT connectivity
Pairing varies from system to system, but you should be able to connect Photon to any standard device such as a computer or phone that uses BT.
First Time Setup
When you first get your Photon it won't be paired to anything. Before starting the pairing process make sure your Photon is unplugged from any devices, the battery is properly installed, and the back toggle switch is set to either the left or right. Open the BT menu on your device. Start the pairing process on your computer/phone/device so it begins to look for BT devices. Next, initiate BT pairing on your Photon by using one of the below keycodes.
- BT1 - Hold
FN+Right Altand tapPgUp - BT2 - Hold
FN+Right Altand tapPgDn - BT3 - Hold
FN+Right Altand tapEnd - BT4 - Hold
FN+Right Altand tapRight
After pressing one of the key combinations above, your Photon should pop up on your device as Photon.
Shortened Version
- Open the BT menu on the device you want to use Photon with so it starts to look for devices.
- Make sure your Photon is not plugged into any device and the battery has been installed.
- Put the toggle switch to the left (for Mac mode) or right (for Windows mode) to turn the battery on.
- Press the key combination that correlates to the BT profile you want the device to be set to. Key combinations can be found above.
- The Photon should pop up in your devices BT pairing interface as Photon once successfully paired.
Understanding How Devices Work
Photon can store 4 devices onboard, meaning once paired you can cycle through 4 devices on the fly. These are called BT1, BT2, BT3, and BT4 on the keymap. Once a device is paired to a specific BT profile, it can be swapped to by hitting the same key combination you used to originally pair it.
If you want to remove a device from a BT profile, cycle to the device using the above shortcuts, and do the following:
- Hold
FN+Right ALTand tapHome
Flashing
While you should never need to flash your Photon, if you find yourself with outdated firmware or want to reset everything this section will assist in the very simple process. This cannot be done wirelessly. Before beginning, please download the firmware here.
Note
If you are an advanced user who wants to customize their firmware beyond what is available in studio, please see our ZMK Module on GitHub.
- Put the PCB into bootloader mode by either double pressing the reset button on the bottom of the PCB or by inputting the following keys on the default keymap: Hold
FN+Right Altand tapLeft Control. - If successful, on Windows a folder or drive will pop up immediately on your computer called
CANNONKKB. This folder represents the storage found on your Photon PCB, and can be found as a removeable storage in file exporer if accidentally closed. If you are on a Mac, the drive will mount and be visible on your desktop as well as the Finder sidebar as CANNONKKB. - To flash, simply drag the firmware downloaded earlier into the
CANNONKKBfolder. If you get an error, unplug your keyboard/PCB, plug it back in, and try again. If successful, the firmware file will copy into the Photon, the folder will close, and your Photon will now have the new firmware applied!
Shortcut guide
Here are some useful shortcuts to help you get the most out of your photon! Please note that the keys refer to the default keymap. If you have made changes, you will need to press different keys.
- Studio Unlock - Hold
FN+Right Altand tapEnter - RGB Toggle - Hold
FN+Right Altand tapSpace - RGB Brightness Up - Hold
FN+Right Altand tapR - RGB Brightness Down - Hold
FN+Right Altand tapF - Charging Indicator On - Hold
FN+Right Altand tapUp Arrow - Charging Indicator Off - Hold
FN+Right Altand tapDown Arrow - Bootloader Mode (Flashing Mode) - Hold
FN+Right Altand tapLeft Control - BT Device 1 - Hold
FN+Right Altand tapPgUp - BT Device 2 - Hold
FN+Right Altand tapPgDn - BT Device 3 - Hold
FN+Right Altand tapEnd - BT Device 4 - Hold
FN+Right Altand tapRight - Clear Current BT Profile - Hold
FN+Right Altand tapHome - Clear All BT Profiles - Hold
FN+Right Altand tapEsc